Wednesday, June 29, 2011

Problems Uploading Jewelry Pictures

Hi everyone.........
I know, I know.... I've been lacking behind in updating my blog again. Thousand apologies!
Took a short break from wirework and now into crocheting with seed/bugle beads. Been at it for the past two weeks or so.

So far, I have completed two bead crocheted bracelets and a necklace. I have problem uploading the pretties over here but I have uploaded them in my Facebook (www.facebook.com/emilysecretpassions.blogspot.com). So, if you want to have a look at the pictures, please head over there.

I'll be making a few more (hopefully) and will upload the pictures in FB if I fail to get them to upload to my blog. Ok.. I'll make this a short one as I've got to string more seed beads .............

So... in the meantime, if you have any inquiries (at all) regarding any of my jewelries, please do not hesitate to email me, ya.

Thanks for your patience & have a nice week ahead!


Wednesday, June 15, 2011

12 Ways To Be Happy .......

12 WAYS TO BE HAPPY ..............

" It's a decision I make every morning when I wake up.
I have a choice ~
I can spend the day in bed recounting the difficulty
I have with the parts of my body that no longer work,
or
get out of bed & be thankful for the ones that do.
Each day is a gift, and as long as my eyes open,
I'll focus on the new day & all the happy memories I've stored away.....
Just for this time in my life.
Old age is like a bank account.
You withdraw from what you've put in.
So, my advice to you would be to deposit a lot of happiness
in the bank account of memories!
Thank you for your part in my Memory Bank.
I am still depositing.

Always keep smiling! "

(** I am just sharing an email created by someone else. I do not claim this as my property. If it belongs to you ~ consider it an honour that I thought your email was worthy enough for sharing. No copyright infringement intended!)

Monday, June 13, 2011

Handmade Wirework Jewelry ~ Chinese Button Earrings (East Meets West)

These earrings are the latest that I've completed. They're Chinese Buttons that you used in Cheongsam dress and "Samfoo" (traditional chinese costume) and I've turned them into earrings. I call it "east meets west" as I've used the chainmaille technique to link them together.

Chinese Buttons Earrings in assorted colours.


Pink/White with Single Mobius & Swarovski Crystal
RM 6.00 /pair

Dark Blue/White with Single Mobius & Swarovski Crystal
RM6.00 /pair

Light Blue w/Single Mobius & Swarovski Crystal
RM6.00 /pair

Apple Green/White with Single Mobius & Swarovski Crystal
RM6.00 /pair

Blue/White with Double Mobius & Swarovski Crystal
RM6.00 /pair

Light Blue (top knotted) with Single Mobius & Swarovski Crystal
RM6.00 /pair

White/Cream with Single Mobius & Swarovski Pearl
RM6.00 /pair

(** Purchase 2 pairs, free postage via registered mail)

(The above links & earwires are crafted with anti-tarnish artistic wire)


Friday, June 10, 2011

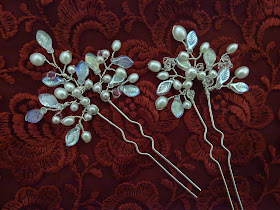
Handmade Wire Wrapped Jewelry - Hair Pins

Had a lot of free time on my hands, so this is what I did ~ Hair Pins


These U-shaped hair pins are done entirely with 18g wire and they measure 3" long. The top part which consists of freshwater pearls, swarovski pearls and bicones and Czech glass leave shaped beads were twisted together to form the sprayed part.

Thanks for dropping by!

Saturday, June 4, 2011

Free Tutorial ~ Wire Wrapped Beaded Adjustable Ring

Whoah ........... at last I managed to upload these pictures! (it gave me a sense of accomplishment!). It took me about half an hour to upload these pictures as initially I didn't know how to upload them in proper sequence and I had to delete and upload them all over again. NOW I KNOW what it's like to do a tutorial!

So..... this is the tutorial that I promised ~ a Wire Wrapped Beaded Adjustable Ring. This simple and easy ring is for those who have learned the basics of wirework and would like to try this out. It looks similar to the "Opposites Attract" Ring that I crafted awhile back but this one uses crystals/pearls/gemstone beads and seed beads, and of course, wire.

Wire Wrapped Beaded Adjustable Ring
(Free tutorial on wire wrapped beaded earrings/ear studs available under "earring" category)


Ok, let's start ......... =)


Tools & Materials:

18 gauge artistic wire (colour of your choice)
26/28 gauge artistic wire (for this ring I use 26g)
2 x 8mm beads of your choice
Some seed beads
Flush Cutter
Round Nose Plier
Chain Nose
Ring Mandrel
Ruler
Marker Pen


Step 1

~ Making the ring base ~

Cut a piece of 18 gauge artistic wire measuring 7" long.
Centre the wire onto the ring mandrel for your finger size as seen in the pic.
Make sure there's equal length on both sides of remaining wire.


Step 2

Turn/shape the wire into a teardrop/paisley shape using the marker pen (as shown)
It will look like the picture below.

(Note: When using smaller or bigger beads, adjust the width frame according to your style)

Let's go to the next step ..............


Step 3

Use your round nose plier to make a small loop at the end of the teardrop shape.
Do the same for the opposite side.


Step 4

~ Coiling ~

Measure and cut about 5 feet of the 26 gauge wire to start coiling the whole ring base. If you have a larger finger size, you may want to cut slightly longer than 5 feet.
Start coiling at which ever end you prefer or comfortable with.


The completed coiled base, with slightly more than 12" of excess wire.
Please do not cut this wire as we're going to use it to wrap/coil the seed beads onto the base.


Step 5

~ Attaching the 8mm beads ~

Cut a piece of 26g wire, measuring 2"
Slip an 8mm round bead through the wire & place it in the middle. Place the bead & 26g wire in the middle of the frame or where the bead can be fitted in.
Wrap both sides of the frame twice with the 26g wire & bring it back to the front
to wrap it around itself twice.
Trim the excess 26g wire with a cutter & press it against the frame
with your chain nose plier.
Do the same for the opposite side.

(Note: You may use your own preferred method to attach the beads)

Let's take a look at Step 6 ......

Step 6

~ Coiling/wrapping the seed beads ~

Use the excess coiling wire (from Step 4) to start wrapping the seed beads.
Make a couple of wraps near the loop & start inserting your seed beads. I use 3 seed beads in alternating colours to make it more interesting.
After inserting the seed beads, wrap it around the frame, bring the wire from front to back and on top of the frame. Insert another 3 seed beads and start wrapping the same way until you reach the other end near the loop
where you started.
Make sure that the seed beads are on top of the frame.


Wrap the 26g wire a few times around the loop (as shown) and trim of any excess wire.
Don't forget to press the wire against the frame with your chain nose plier.

Start wrapping the seed beads for the other side by cutting a piece of new 26g wire, measuring 12 inches. Please follow Step 6.


Back view of the ring, as neat as the front.
You may want to adjust the ring on the mandrel again for the right fit.

Voila! You're Done!

Below are a couple of pictures that I've done with this technique. I have since made a few rings and stud earrings with different colours to match my wardrobe.


Wire Wrapped Beaded Stud Earrings


Wire Wrapped Beaded Adjustable Ring (with gemstone)

How I wish I could have more pictures to accompany this step by step tutorial.
Well, anyway, I hope you have enjoyed this tutorial.
If you have any questions regarding this tutorial or anything else regarding the work you see here, please do not hesitate to email me at emilytanmeisin@yahoo.com

Have a wonderful week ahead ! =)

Thursday, June 2, 2011

Handmade Wire Wrapped Adjustable Ring

Hello again as Emily is back from her unofficial break.
I am so happy (well, not just me but every member in the family!) now that we got back our computer from the workshop yesterday and here I am updating my blog again.

Been playing with wires and seed beads and ended up with this adjustable ring. It looks something like the "Opposites Attract" Adjustable Ring that I made awhile back but this one uses seed beads around the frame.

I've thought of doing a tutorial (for free) for this very simple and easy ring which is suitable for a beginner who has already learned the basics of wirework jewelry making. I'll make an attempt to do the tutorial but since I've not done it before, it could take awhile though.

So, don't forget to drop by my blog from time to time to check it out.


Hmm ......... the ring looks good on my finger, eh?
Just focus on the ring and not my fingers, ok.


Alrite, that's about all I am sharing for today.

Thanks for dropping by and have a wonderful week ahead. =)